Showing posts with label Embroidery. Show all posts

Tuesday, 19 May 2015

Unit X | Final Collection

Our presentation to Tom went well last week, and the main point to improve on was the presentation of the samples, and to provide pictures of the knits as they are too complicated to draw. We were really happy with the feedback we got from him and the other groups.

Now that the group work is done we had a week to focus on our individual projects. We have continued to work together in the studio to help each other out until the deadline. Me and Pipp have been taking advice from Nicole on things we haven't had to do before, like garment flats, breakdowns of each design and other things we need to create a final collection file. I'm glad we have had this unit to learn things that are needed to design for the fashion industry, such as technical drawings and range plans. I feel like learning these skills is going to benefit me in future units.


I finally put together my final collection. I made decisions based on people's opinions and I also tried to incorporate as many of my best samples as I could. I wanted to make use of both my print and embroidery samples so that there was a mix of texture through my collection. 


I am happy with the way my collections looks, however if I could go back and change one thing it would be to be less safe with my designs. As this is the first fashion unit I have done I was focused on the new processes we had to do. In the future, I would like to me more experimental and out-going with my final collections. 

Tuesday, 28 April 2015

Unit X | Print Room Experimentation

This week me and Nicole went into the print room to start creating samples. Overall it went really well and we have come out with some really good samples. I plan on embroidering into the ones that didn't work as well or cutting them up to stitch together or pin tuck. 

Before I started printing I did some plain embroidered pieces with the intention of printing on them. The inspiration for this came from Eleanor's workshop on the french technique entre deux. They helped to create a different texture which looks really nice in certain places. Also, the pigment changed colour very slightly on the varied fabrics I had stitched together, I think this is quite interesting.


In order to tie our work together and experiment with the specialisms, Pipp made us some plain and pleated knits to print on. These also created a really nice texture as the pigment was only applied on the highest points of the knit. I think the mix of the two specialisms was really successful and created some great samples.


The rest of my samples were on plain previously dyed fabrics. I experimented with different weights and thickness such as Suede, Chiffon, Voile and Organza. I tried to vary the amount of print on each fabric, the colours used and the process used. I also tried various techniques such as foiling and puff binding and pigment printing. Overall I am really happy with the two days we spent printing and I am pleased with the motifs I chose to use, as they were very flexible and easy to manipulate.


Monday, 20 April 2015

Unit X | Fabric Sourcing and Emboridery

This week we sourced our fabrics in order to prepare them for sampling. We decided to stay experimental with our fabrics and give ourselves a lot to work with. I went for a range of cottons and silks, both light and heavy weight.
We attempted to source outside of the universities resources and visited Bennett Silks. A few fabrics took our interest but the prices were around £23-£28 a metre, which on a student budget isn't very economical. In the end most of our fabrics came from the MMU fabric store, with the exception of a few online buys and some sourced from fabric shops in the city centre.
We dyed the fabrics different grey shades to keep with our colour palette.


Me and Nicole also sorted out our screens for the print room and booked some space. Unfortunately the print room can get very busy and is often fully booked, so to prevent people being left with no time there is a new rule for this unit where you can only book two days per week. Because of this, I will need some other form of sampling to experiment with as my time printing will be really limited.

Another specialism I have been mixing with print is embroidery. I thought I could develop the embroidery skills I already have in both machine and hand. I started by pin tucking different fabrics with different needle sizes, and also layering fabrics together to see what texture was created. I think they turned out well and they relate to the bandage drawings I have chosen to screen print. I plan to incorporate the two mediums together and possibly pin-tuck a screen print or print on top of some embroidery. 


Tuesday, 10 February 2015

Live Brief | Bradford Textiles Development

Another live brief I decided to have a go at is the Bradford Textile design competitions. I am submitting a design for the 'P2 Prestigious Textiles Award' which requires a printed textile design for interiors. I want to attempt an entry for this award in particular as I have never experimented with interiors, I have only ever focused on fashion. This is a good opportunity to have a try as in Unit X I have chosen to continue with a fashion-focused option.
I'm going to make use of the prints I already have from my self-initiated brief and alter them to fit the live brief, meaning I needed to put them into repeat. I was sceptical about how they would look in repeat however when I created them I really liked the results. I like them that much that I chose to include them in my self-initiated brief as well.


After putting the prints into repeat I started to place them onto curtains and cushions to see if they look like a realistic interior print. They turned out quite successful, however I don't think the curtains work as well as the cushions. I particularly like the cushions because I can see them being part of a collection of cushions in the middle of an otherwise plain bead spread, or something in that ball park.


The brief for the Prestigious Textiles award says that embroidery can be used. I took embroidery for a unit last year and have thought about mixing the two specialisms before but I have never physically done it. I have felt really experimental this unit as I want to really push myself and find out what I can do before L6. Because of this I thought why not try out some embroidery on top of the print? The idea I have in my head is to create a statement cushion that would be used for decorative purposes.
I wanted to try embellishing/beading on top of my prints, because I don't think just a stitch would stand out enough against the busy backgrounds. As I've never used embroidery and print together I've never had to find the supplies before. I researched fabric and haberdasheries around Manchester to make a go-to list; Fred Aldous, Abakhan, Affleck's Palace, Hobbycraft were a few. I visited Affleck's Palace before heading to Abakhan where I found exactly the beads I was after. Due to the amount of colour in my prints already I felt the need to keep the beads more toned down and neutral. I went for Clear, Gold and Navy beads.
 I am really happy with the development samples, the beading looks better than I hoped it would. In particular, the use of the long bugle beads was really effective and went well with my prints. For the final boards which I will submit with my application, I am going to digitally print a 30cm x 30cm square of fabric and embellish it to give the appearence of the final cushion.

Sunday, 8 December 2013

Discussing Textile Worlds

This week we were put into groups in order to share our experiences of our different textile worlds.
I found this task incredibly helpful. I am going into Print next week, and was placed with two people who have just finished their unit of Print. This was especially useful as I got to see two examples of Print work rather than just one, which gave me a better understanding of what sort of work will be expected of me.

One thing I was informed of which is particularly important for me is that when you miss work it is hard to catch up on. I am terrible for leaving things until the last minute which I did eventually improve in the last unit. However now I know that I have to keep on work from the very start.  Another piece of useful information I was told was that the print room gets booked up very fast, so in order to get enough time to make my samples I need to book early.

I generally found the session beneficial, as I learned the general schedule of print and what I will be expected to do each week. I liked the work I was shown by my peers so I look forward to creating my own samples. Furthermore I feel more prepared than I was before embroidery, as no one had done it before and didn't know what was coming. Also, I found the exchange of information between me and peers a lot more beneficial than the information we are given off the tutors, as it is more personal and is the point of view of someone my age.

Monday, 18 November 2013

Embroidery | Week 5

This week in Embroidery we were told to do 2 samples based on our drawings, and then carry on to do another 10 hand stitched samples.
It felt like a huge difference going from machine to hand stitch because the samples take so much more time, even though there is less there are only 5 fewer than we had to do in machine.
I also struggled more with ideas on what to do more than in machine. Eventually I came up with a few ideas but some didnt work very well.
Before this week I'd never really used bondaweb, however when I was stuck with ideas I found myseld using it to give my samples something more. As hand stitch takes so long its hard to make the sample look like it has structure, but I found bondaweb made this easier for me.


This is one of my favourite hand stitch samples. I used bondaweb to glue on some black silk organza. The idea was to take inspiration from the drawings of braids I did in my sketchbook. I think this one works quite well with the french knots.

This is another one inspired by my drawings of hair. I used the same technique as the sample above but with the colours reversed, then used ladder stitch rather than the french knots. I dont think this one was as successful. I prefer the french knots, however I did find that I liked the back more than I liked the front. After I'd cut off all of the excess threads I quite liked the look of the marks left on the fabric.


This hand stitching came as a result of my dream catcher drawings. It it mainly ladder stitch with a few french knots running along the bottom. I quite like how this turned out however I'd like to try it in a few more ways, and experiment with the pattern in the middle of the circle. I think button hole stitch would look really good if I can do it well.

These next two samples were inspired by the bricks I first drew from the chance cards. Again I used bondaweb to stick down the blocks of various fabrics, then I used a messy ladder stitch to join them all up. Although I dont think this is amazing I quite like the different shades of materials and how they work together.

Here I tried the bricks again but with a much thinner fabric to see how it would work. I like how the fabric creases under the stiching and how some of the thread lifts of the surface because of it. I doubled the thread over in some places and pulled it tighter which I think works quite well. As they are supposed to be bricks, I wouldn't want them to be perfect and precise as bricks themselves are usually dirty and worn.


Thursday, 14 November 2013

Embroidery | Week 4

 This week we moved onto hand stitch.
We started by learning the 3 basic stitches: Straight, Ladder and Chain. After completing some samples of these stitches for my technical file I started to do the 2 samples of French Knots we'd been set. I think French Knots are really simplistic but populate a fabric really well when you put them in the right place. Although they're quite time consuming I like the outcome they create.
I was also inducted on the Cornelly machines. We got to practice on each of the different stitches (heavy chain, fine chain, fine moss etc) I am going to inclue these in my technical file.
Next week we are creating samples based on our drawings.


French Knots
This is one of my samples of the French Knots. I really like this. The fabric is black Silk Organza, as it is see through you can see the threads that connect the knots on the back. I did this on purpose so made sure the threads would go in a circular motion rather than all over the place. I think the threads make it look better than it would if they couldn't be seen.


After doing some practice on each of the different cornelly machines, I made this sample. I think the cornelly machines are very hard to control and I can't see myself creating anything that doesnt look like a doodle. However we have to create 5 cornelly samples so I am going to experiment with different patterns.


One thing I found interesting about the cornelly machines was the back of the sample. There was no loose threads and everything is exactly how it is on the front, just a bit thinner. In future I may think about using the back of the cornelly sample rather than the front.

Wednesday, 6 November 2013

Embroidery | Week 3

In our last week of Embroidery we had another 15 samples to complete.
We also learned the technique Pin tucking. We learned how to use the three different feet with various sized grooves and which fabrics they each work best with.
With another technique to make use of, these 15 samples were much easier, similar to last week. Pin tucking was a nice change in technique as the outcome of the samples were very different to previous ones. Next week we move onto Hand stitching.


This is the largest grooved foot with a wool flannel material as it is very thick. I tried to create a pattern here which I think turned out ok however it could have been done a lot better.The semi-circle shape was hard to create but the grooves in the foot made it easy to follow.


This is the smallest groove of Pin tucking on velvet fabric. I really like the outcome of this, it did take a long time to make as each line was stitched individually but it really works. The material started to fold under itself, however I managed to iron it out and still leave a little but of shape, which I like. I decided to leave the ends of the threads hanging which I think works well.


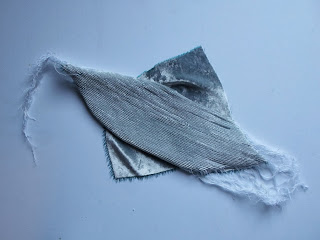
Here I have used Pin tucking along the lines however it is hard to notice without feeling the fabric. There are raised areas that you cannot see in a photograph. This is just lines of pin tucking on different fabrics put together.


I really like this sample. It is a mixture of Pin tucking, Hair pinning and straight stitch. You can see the pintucking in the middle of the fabric because of the way it creases. The black fabric is a thick suade which is why this works well.


Wednesday, 30 October 2013

Embroidery | Week 2

This week we were taught 2 new techniques: Hair Pinning and Tailor Tacking. We were also inducted on the Tufting Machines and so could use this technique too.
I really like all of these techniques and I find them easy to do. One of my favourite aspects of each is that there are so many variations of each that you can create, meaning there can be hundreds of different outcomes. As a result of this I found this week's 15 samples a lot more enjoyable to create, because I had more ideas.
Another reason I enjoyed these techniques is because previously I have never used machine feet other than a straight foot and a darling foot. I found it interesting to use machine feet that I'd never used before.
Although I feel I have improved a lot on last weeks samples, there is still room for improvement with these ones too. However I am a lot happier with my samples overall this week.


Here are three of my samples that included the Hair-Pinning technique. All were carried out the same way yet the outcomes are totally different, which I really like. It is all down to using different materials and threads. Hair-Pinning is one of my favourite techniques to use as I really like the effect it creates. I think there are still many ways to experiement with it which I look forward to trying.
This is one of my samples using the Tufting machine. It was quite intimidating at first but I eventually got the hang of it. I found Hair Pinning and Tailor Tacking were easier to come up with ideas for, which is why more of my samples use those techniques. However Tufting can be very effective, I especially like it when the threads are cut down closer to the fabric. I added to this tufting with straight stitch and Tailor Tacking.

I really like Tailor Tacking, particularly when it is used with gradual threads. I experimented with gradual threads with this technique and then I found it hard to stop using the two together because I like the outcome so much. This is my favourite sample of Tailor Tacking, I think it worked well because it is based on one of my drawings.


This is one of my favourite samples from this week. This includes both Tailor Tacking and Hair Pinning. Again I've used the gradual threads because I think it adds more to the sample in comparison to one-coloured threads. Furthermore, the gradual thread I chose comes out with a hint of purple when placed against black fabric, adding a tiny bit of colour which I really like.


Tuesday, 22 October 2013

Embroidery | Week 1

In the first week of Embroidery, we were split into two groups; Hand and Machine.
My group started with machine stitch. For this week we were only given a straight stitch and a regular domestic needle. Our target was to complete 15 samples. I found this quite difficult, as it was hard to come up with ideas in such a short space of time. However we were only given a monochrome palette to work with which did eliminate having to take colour into account.
Overall I wasn't that happy with my samples as they were all rushed and I didnt base them on my drawings, meaning I didnt put much thought into what I was doing. Also, I think my stitching is messy as I was more focussed on getting the samples done rather than doing them well.
 

I think this sample has potential, however I really rushed the stitching. I should have stitched in white thread rather than black as well as making it neater and less obvious.

Again I think this idea is ok but I have carried it out in the wrong way. The technique of wrapping thread into circles and stitching them down is good, however I have rushed and left strands going everywhere. Furthermore I should have stitched them in more places as they weren't secure enough and ended up hanging off the fabric.

As I felt very restricted by the straight stitch and foot, I tried to experiement with other things that I could vary. Instead of using thread or material, I stitched on some wooden sticks from the cafe that I'd snapped and cut in half to make sure they would fit into the zig-zag stitch of the machine. Although this was different to any other samples I'd created, I feel it could have been made better by expanding ideas, such as covering the whole fabric.