Wednesday, 20 November 2013

Evaluation of Origins Unit


Origins has been a very interesting unit for me. I feel that I have vastly broadened my capabilities and my understanding of what drawing can be. At the start of the unit, I feel like I was very small-minded and not open to experimenting outside my comfort zones. However, with the tasks we’ve been set throughout I think I have become much more versatile and flexible, which I never saw myself doing.

At first, I found it difficult to incorporate my chance card drawings into my other work because my drawings were so limited. However as the unit went on and I learned to look into what drawing actually is, my drawing became more usable in Embroidery. I have begun to look at objects in various ways rather than just looking at it as a whole. This has really helped me to develop my work and come up with new and stimulating ideas.

I have found that taking one image or idea and working on it a few times gives a better outcome than making several different ideas one by one. By taking these images from my drawings, they have been turned from an object, into a sketch, into stitching on a piece of fabric. Although this final sample may not look like the original object, it has been innovated into something possibly better.

Managing time was a problem for me in the beginning. I found myself rushing to meet the weekly deadlines, which took an effect on the quality of my work. However through the unit I have developed a routine and although I don’t plan my week minute by minute, I am getting things done more comfortably. I am able to work this around a social life without getting stressed out and losing my head. This for me is quite an achievement as I normally leave everything until the last minute. Even though I still have a to-do list a few days before the deadline, I feel my more effective time management has cut this list short.

The Origins unit has made me try new things and change my opinion on what I do and don’t like. Previously I preferred to work on smaller pieces of paper and do detailed drawings. Yet because the drawing Fridays have had me working on no smaller than A3 paper, I now quite enjoy working on a bigger surface and I feel in future I will choose this myself without having to be told.

Overall, this unit has given me the skills to challenge my own preconceptions of an object, and experiment with different techniques that I may have never even considered before. Although I feel I have definitely grown a lot as a textile artist, there are still many things I have yet to try, but from now on I will take this head on rather than being closed-minded.


Monday, 18 November 2013

Embroidery | Week 5

This week in Embroidery we were told to do 2 samples based on our drawings, and then carry on to do another 10 hand stitched samples.
It felt like a huge difference going from machine to hand stitch because the samples take so much more time, even though there is less there are only 5 fewer than we had to do in machine.
I also struggled more with ideas on what to do more than in machine. Eventually I came up with a few ideas but some didnt work very well.
Before this week I'd never really used bondaweb, however when I was stuck with ideas I found myseld using it to give my samples something more. As hand stitch takes so long its hard to make the sample look like it has structure, but I found bondaweb made this easier for me.


This is one of my favourite hand stitch samples. I used bondaweb to glue on some black silk organza. The idea was to take inspiration from the drawings of braids I did in my sketchbook. I think this one works quite well with the french knots.

This is another one inspired by my drawings of hair. I used the same technique as the sample above but with the colours reversed, then used ladder stitch rather than the french knots. I dont think this one was as successful. I prefer the french knots, however I did find that I liked the back more than I liked the front. After I'd cut off all of the excess threads I quite liked the look of the marks left on the fabric.


This hand stitching came as a result of my dream catcher drawings. It it mainly ladder stitch with a few french knots running along the bottom. I quite like how this turned out however I'd like to try it in a few more ways, and experiment with the pattern in the middle of the circle. I think button hole stitch would look really good if I can do it well.

These next two samples were inspired by the bricks I first drew from the chance cards. Again I used bondaweb to stick down the blocks of various fabrics, then I used a messy ladder stitch to join them all up. Although I dont think this is amazing I quite like the different shades of materials and how they work together.

Here I tried the bricks again but with a much thinner fabric to see how it would work. I like how the fabric creases under the stiching and how some of the thread lifts of the surface because of it. I doubled the thread over in some places and pulled it tighter which I think works quite well. As they are supposed to be bricks, I wouldn't want them to be perfect and precise as bricks themselves are usually dirty and worn.


Friday Drawing Session

I have chosen to do a post on the drawing session we had this friday.
I really enjoyed this session, because it made me look at drawing in a different way. We had to buy a Kinder egg and take apart the toy that came inside. After that, we used the toy to create marks and prints on the page, and I thought the result was really interesting.
I haven't experimented very much with using things to draw other than a pencil or a paintbrush, however I was really pleased with the drawings I did using the toy car.They're very different to anything I've drawn before.


I created this print by using the plastic body of the car, I tried to make it look like a tyre track going up the page.

Here I used as many parts of the car as I could to create as many different prints as I could, I tried doing single prints, layering them together and also dragging them cross the page. It was interesting to see what one little toy can do with ink.
 
 
One thing that really surprised me was the amount of different marks one tiny toy car could make. When the car was taken apart there was many more edges and surfaces that could be used to print or drag acorss the page. Even though it got a bit messy the prints came out really well.


This one was one of my favourites from the session. I used the kinder egg box itself to print circles onto the page, then I used masking tape to stick it to wall in order to create the dripping ink. It wasn't deliberate but I think it looks like gun shot wounds.


Saturday, 16 November 2013

Dream Catchers

As part of my extra drawing continued from the Chance Cards, I accidentally ended up drawing what looked like a Dream Catcher. I became quite interested in them, and I've done a few drawings now which came from the orginal shape or idea of a dream catcher. I've never really focussed on them before, however the various shapes involved proved interesting to draw.


This was the drawing which wasn't intended to be anything in particular, but ended up looking a lot like a Dream Catcher. From this I began to think about the shapes inside the circle and also the feathers and strings that hang from the bottom.

As part of one of the drawing fridays we had to write words associated with a sentimental item. I got the idea to put the words in a circlular shape from the drawing I'd been doing of Dream Catchers.


Here are some more experimental drawings I did based om the ideas of a dream catcher. The first is watercolour and indian ink, with which I added words around the circles, an idea I took from the previous drawing day.
After that I attempyed to draw feathers. I dont think they worked very well as I just painted them however I may experiment with different tools in order to get the right shape and a thinner brush.
The third image was just experimenting with a different background, as well as playing around with the shapes and patterns inside the circle of a dream catcher.


Thursday, 14 November 2013

Embroidery | Week 4

 This week we moved onto hand stitch.
We started by learning the 3 basic stitches: Straight, Ladder and Chain. After completing some samples of these stitches for my technical file I started to do the 2 samples of French Knots we'd been set. I think French Knots are really simplistic but populate a fabric really well when you put them in the right place. Although they're quite time consuming I like the outcome they create.
I was also inducted on the Cornelly machines. We got to practice on each of the different stitches (heavy chain, fine chain, fine moss etc) I am going to inclue these in my technical file.
Next week we are creating samples based on our drawings.


French Knots
This is one of my samples of the French Knots. I really like this. The fabric is black Silk Organza, as it is see through you can see the threads that connect the knots on the back. I did this on purpose so made sure the threads would go in a circular motion rather than all over the place. I think the threads make it look better than it would if they couldn't be seen.


After doing some practice on each of the different cornelly machines, I made this sample. I think the cornelly machines are very hard to control and I can't see myself creating anything that doesnt look like a doodle. However we have to create 5 cornelly samples so I am going to experiment with different patterns.


One thing I found interesting about the cornelly machines was the back of the sample. There was no loose threads and everything is exactly how it is on the front, just a bit thinner. In future I may think about using the back of the cornelly sample rather than the front.

Wednesday, 6 November 2013

Embroidery | Week 3

In our last week of Embroidery we had another 15 samples to complete.
We also learned the technique Pin tucking. We learned how to use the three different feet with various sized grooves and which fabrics they each work best with.
With another technique to make use of, these 15 samples were much easier, similar to last week. Pin tucking was a nice change in technique as the outcome of the samples were very different to previous ones. Next week we move onto Hand stitching.


This is the largest grooved foot with a wool flannel material as it is very thick. I tried to create a pattern here which I think turned out ok however it could have been done a lot better.The semi-circle shape was hard to create but the grooves in the foot made it easy to follow.


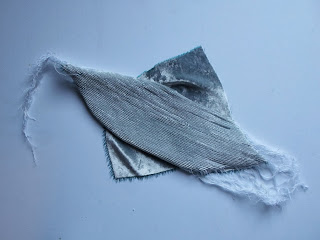
This is the smallest groove of Pin tucking on velvet fabric. I really like the outcome of this, it did take a long time to make as each line was stitched individually but it really works. The material started to fold under itself, however I managed to iron it out and still leave a little but of shape, which I like. I decided to leave the ends of the threads hanging which I think works well.


Here I have used Pin tucking along the lines however it is hard to notice without feeling the fabric. There are raised areas that you cannot see in a photograph. This is just lines of pin tucking on different fabrics put together.


I really like this sample. It is a mixture of Pin tucking, Hair pinning and straight stitch. You can see the pintucking in the middle of the fabric because of the way it creases. The black fabric is a thick suade which is why this works well.


Saturday, 2 November 2013

Continued Drawings

Throughout the past few weeks I have continued to do drawings similar to the Chance Cards, however not with the guidelines. I feel that I can now expand on how I draw things and what I use to draw them without always referring to the chance cards. I am also going to use these drawings as inspiration when doing my samples for Embroidery.
 

Braided Hair
This is a drawing I did using black Indian ink. It is initially based off hair, however I ended up improvising a little. I used a very thin brush in order to make it look more like strands of hair. I quite like this drawing even though it doesnt look exactly like the hair I was drawing.


I was quite interested with the idea of drawing braided hair, which lead to me doing a larger scale version in colour. I stuck together two A3 pieces of paper using masking tape and used pastels to draw the hair. The drawing is done from a picture of my own hair which has been dip-dyed, this explains the colour changes.


Windows
 
Originally this was a photo I took in the City of some barred windows. When drawing it, I decided I wanted to add some colour but the windows themselves were very dull so I decided to add some brighter colours instead, using watercolour paint.